Creating an app with Visual Studio 2022 for Windows
Create the App
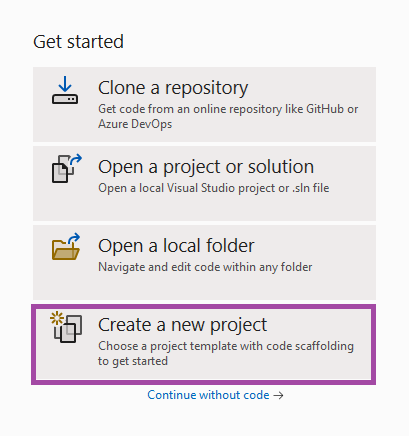
To create an Uno Platform app:
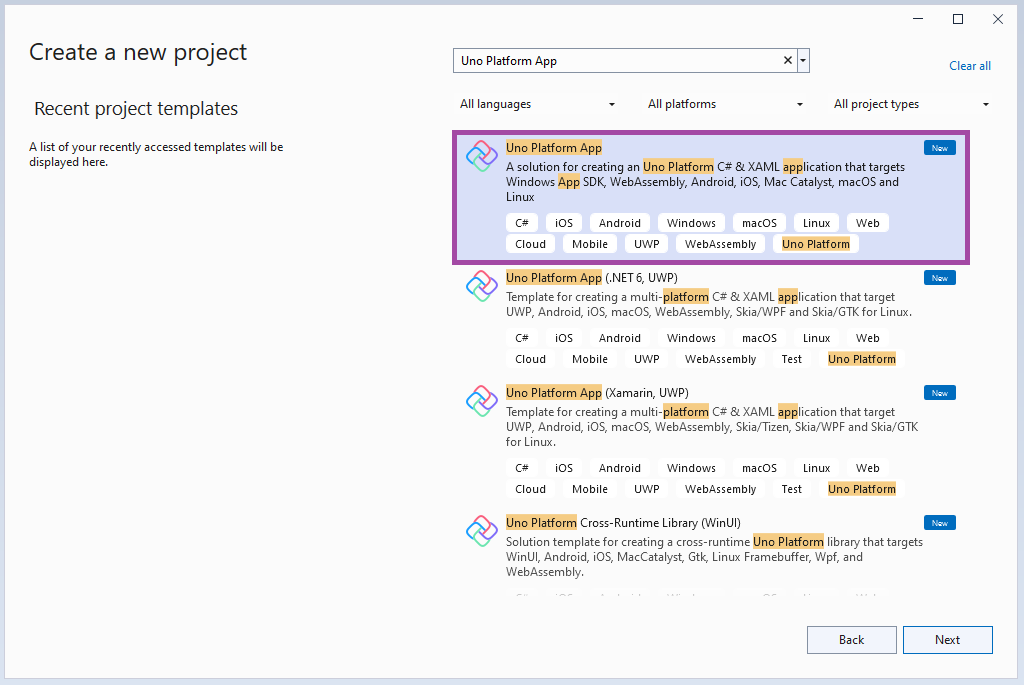
Create a new C# solution using the Uno Platform App template, from Visual Studio's Start Page, then click the Next button
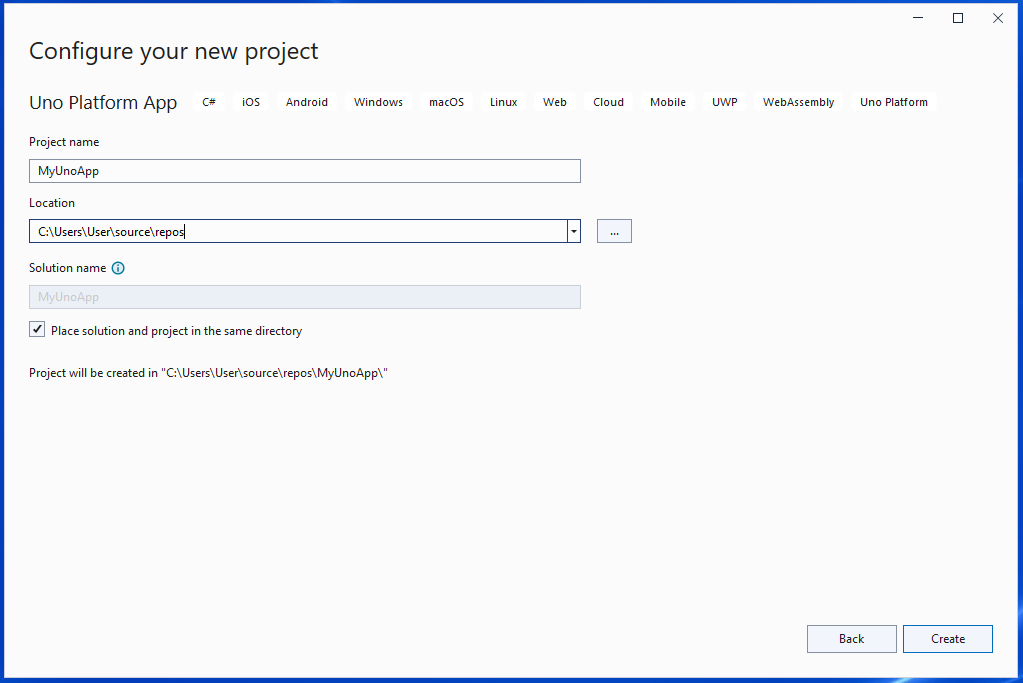
Configure your new project by providing a project name and a location, check the "Place solution and project in the same directory" option, then click the Create button
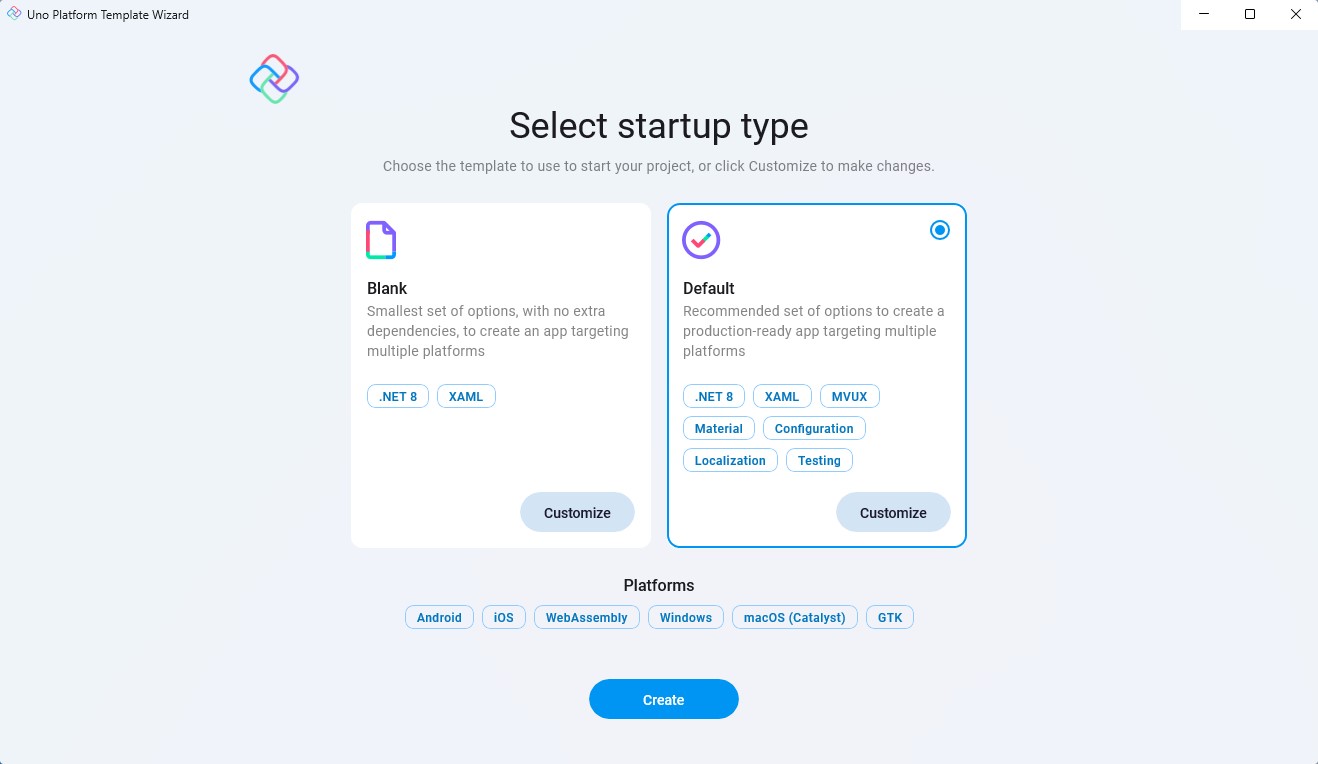
Choose a template to build your application
Tip
For a detailed overview of the Uno Platform project template wizard and all its options, see this.
Click the create button
Wait for the projects to be created, and their dependencies to be restored
A banner at the top of the editor may ask to reload projects, click Reload projects:

Debug the App
To run the Windows (WinAppSDK) head:
- Right-click on the
MyApp.Windows project, select Set as startup project
- Select the
Debug|x86 configuration
- Press the
MyApp.Windows button to deploy the app
- If you've not enabled Developer Mode, the Settings app should open to the appropriate page. Turn on Developer Mode and accept the disclaimer.
To run the WebAssembly (Wasm) head:
- Right click on the
MyApp.Wasm project, select Set as startup project
- Press the
MyApp.Wasm button to deploy the app
- To run/debug your WebAssembly app on a mobile device, you can utilize the Dev Tunnels feature of Visual Studio 2022 (see Microsoft Learn documentation to get started)
To run the ASP.NET Hosted WebAssembly (Server) head:
- Right click on the
MyApp.Server project, select Set as startup project
- Press the
MyApp.Server button to deploy the app
To debug for iOS:
Right-click on the MyApp.Mobile project, select Set as startup project
In the "Debug toolbar" drop-down, select framework net7.0-ios:

Select:
An active device, if your IDE is connected to a macOS Host
A local device using Hot Restart, to debug your application without connecting to a mac
Note
If no iOS devices are available, a Visual Studio 17.7+ issue requires unloading/reloading the project. Right-click on the .Mobile project and select Unload Project then Load project.
To debug the Android platform:
- Right click on the
MyApp.Mobile project, select Set as startup project
- In the Debug toolbar drop down, select framework
net7.0-android
- Select an active device in the "Device" sub-menu
Note
If no android devices are available, a Visual Studio 17.7+ issue requires unloading/reloading the project. Right-click on the .Mobile project and select Unload Project then Load project.
To debug your Skia+GTK head:
- Directly on Windows:
- Right-click the
MyApp.Skia.Gtk project, select Set as startup project
- In the debug toolbar, next to the green arrow, select
MyApp.Skia.Gtk, then press F5.
- Using WSL:
In the debugger menu, next to the green arrow, press the drop down to select WSL
If this is the first time debugging the app:
Locate and open the Properties/launchSettings.json file
In the "WSL" section, add the following:
  ```json
  "environmentVariables": {
      "DISPLAY": ":0",
      "GDK_GL": "gles"
  },
  ```

  The section should look then like this:

  ```json
  "WSL": {
      "commandName": "WSL2",
      "distributionName": "",
      "environmentVariables": {
          "DISPLAY": ":0",
          "GDK_GL": "gles"
      }
  }
  ```
Then press F5 or the green arrow to start debugging the app
You're all set!
Important
Take a look at our article in order to ensure that your solution is building and showing intellisense as fast as possible, and to avoid this Visual Studio issue (help the community by upvoting it!) where multi-targeted project libraries always build their full set of targets.
Next Steps
Now that you're Created and Debug the App.
Learn more about: