Get Started on VS Code
This guide will walk you through the set-up process for building apps with Uno under Windows, Linux or macOS.
See these sections for information about using Uno Platform with:
Prerequisites
- Visual Studio Code
- .NET SDK
- .NET 7.0 SDK (version 7.0 (SDK 7.0.102) or later)
Use
dotnet --versionfrom the terminal to get the version installed. - The Uno Platform Visual Studio Code Extension
- For Windows, install the GTK+ 3 runtime (See this uno-check issue)
Verify your developer environment
Open a command-line prompt, Windows Terminal if you have it installed, or else Command Prompt or Windows Powershell from the Start menu.
a. Install the tool by running the following command from the command prompt:
dotnet tool install -g uno.checkb. To update the tool, if you already have an existing one:
dotnet tool update -g uno.checkRun the tool from the command prompt with the following command:
uno-checkFollow the instructions indicated by the tool.
You can find additional information about uno-check here.
Developing an Uno Platform project
Create the project
Let's start by installing the Uno project templates. In a terminal, type the following command:
dotnet new install Uno.Templates
Then inside the same terminal, type the following to create a new project:
dotnet new unoapp -o MyApp -preset=blank -platforms android ios maccatalyst wasm gtk --vscode
Tip
MyApp is the name you want to give to your project.
This will create a blank template app that only contains the WebAssembly, Skia+GTK and Mobile platforms support.
Important
Mobile targets cannot be built under Linux. If you are using Linux, you'll need to remove android ios maccatalyst from the platforms list. The previous command would become dotnet new unoapp -o MyApp -preset=blank -platforms wasm gtk --vscode.
Configuring VS Code
If you are new to VS Code or to developing C# applications with VS Code take the time to follow the next steps.
- Open VS Code
- If this is not a new installation then try to update it. Press
F1and typeCode: Check for Updates...and select it. A notification will tell you if an update is available. - Configure VS Code to start from the command-line using the
codecommand. This can be configured by following these instructions. - Install the C# extension. Press
F1and typeExtensions: Install Extensions, search the marketplace for C# and click the Install button. - Install the Uno Platform extension. Press
F1and typeExtensions: Install Extensions, search the marketplace for Uno Platform and click the Install button.
No other extensions are needed to complete this guide.
Prepare the application
Open the project using Visual Studio Code. In the terminal type
code ./MyAppVisual Studio Code might ask to restore the NuGet packages. Allow it to restore them if asked.
Once the project has been loaded, in the status bar at the bottom left of VS Code,
MyApp.slnis selected by default. SelectMyApp.Wasm.csproj,MyApp.Skia.Gtk.csprojorMyApp.Mobile.csprojinstead.
Modify the main page
In
MainPage.xaml, replace the Grid's content with the following:<StackPanel> <TextBlock x:Name="txt" Text="Hello, world!" Margin="20" FontSize="30" /> <Button Content="click" Click="{x:Bind OnClick}" /> </StackPanel>In your
MainPage.xaml.cs, add the following method:private void OnClick() { var dt = DateTime.Now.ToString(); txt.Text = dt; }
Run and Debug application
WebAssembly
- In the debugger section of the activity bar select
Debug (Chrome, WebAssembly) - In the status bar, ensure the
MyApp.Wasm.csprojproject is selected - by defaultMyApp.slnis selected. - Press
F5to start the debugging session - Place a breakpoint inside the
OnClickmethod - Click the button in the app, and the breakpoint will hit
Skia GTK
- In the debugger section of the activity bar select
Skia.GTK (Debug) - In the status bar, ensure the
MyApp.Skia.Gtk.csprojproject is selected - by defaultMyApp.slnis selected. - Press
F5to start the debugging session - Place a breakpoint inside the
OnClickmethod - Click the button in the app, and the breakpoint will hit
Note that C# Hot Reload is not available when running with the debugger. In order to use C# Hot Reload, run the app using the following:
On Windows, type the following:
$env:DOTNET_MODIFIABLE_ASSEMBLIES="debug"
dotnet run
On Linux or macOS:
export DOTNET_MODIFIABLE_ASSEMBLIES=debug
dotnet run
Mobile Targets (iOS, Android, Mac Catalyst)
The Uno Platform extension provides support for debugging:
- The Android target on Windows
- The iOS, Android and Mac Catalyst targets on macOS
It is also possible to use Remote - SSH addin to connect to a macOS machine from a Windows or Linux machine to debug iOS and Mac Catalyst apps remotely.
Debugging for Android
In the status bar, select the
MyApp.Mobileproject - by defaultMyApp.slnis selected.
To the right of
MyApp.Mobile, click on the target framework to selectnet7.0-android | Debug
Then, to the right of the target framework, select the device to debug with. You will need to connect an android device, or create an Android simulator.

Finally, in the debugger side menu, select the
Uno Plaform MobileprofileEither press
F5or press the green arrow to start the debugging session.


Once your app is running, place a breakpoint in the OnClick method, the breakpoint will be hit when clicking the button in the app.
You can find advanced Code debugging topic here.
Using code snippets
Adding a new Page
- In the MyApp folder, create a new file named
Page2.xaml - Type
pagethen press thetabkey to add the page markup - Adjust the name and namespaces as needed
- In the MyApp folder, create a new file named
Page2.xaml.cs - Type
pagethen press thetabkey to add the page code behind C# - Adjust the name and namespaces as needed
Adding a new UserControl
- In the MyApp folder, create a new file named
UserControl1.xaml - Type
usercontrolthen press thetabkey to add the page markup - Adjust the name and namespaces as needed
- In the MyApp folder, create a new file named
UserControl1.xaml.cs - Type
usercontrolthen press thetabkey to add the page code behind C# - Adjust the name and namespaces as needed
Adding a new ResourceDictionary
- In the MyApp folder, create a new file named
ResourceDictionary1.xaml - Type
resourcedictthen press thetabkey to add the page markup
Other snippets
rdcreates a newRowDefinitioncdcreates a newColumnDefinitiontagcreates a new XAML tagsetcreates a newStylesetterctagcreates a newTextBlockclose XAML tag
Updating an existing application to work with VS Code
An existing application needs additional changes to be debugged properly.
- At the root of the workspace, create a folder named
.vscode - Inside this folder, create a file named
launch.jsonand copy the contents of this file. - Replace all instances of
MyExtensionsApp._1with your application's name inlaunch.json. - Inside this folder, create a file named
tasks.jsonand copy the contents of this file.
Known limitations for VS Code support
- C# Debugging is not supported when running in a remote Linux Container, Code Spaces or GitPod.
- C# Hot Reload for WebAssembly only supports modifying method bodies. Any other modification is rejected by the compiler.
- C# Hot Reload for Skia supports modifying method bodies, adding properties, adding methods, adding classes. A more accurate list is provided here in Microsoft's documentation.
Troubleshooting Uno Platform VS Code issues
If you're not sure whether your environment is correctly configured for Uno Platform development, running the uno-check command-line tool should be your first step.
The Uno Platform extension provides multiple output windows to troubleshoot its activities:
- Uno Platform, which indicates general messages about the extension
- Uno Platform - Debugger, which provides activity messages about the debugger feature
- Uno Platform - Hot Reload, which provides activity messages about the Hot Reload feature
- Uno Platform - XAML, which provides activity messages about the XAML Code Completion feature
If the extension is not behaving properly, try using the Developer: Reload Window (or Ctrl+R) command in the palette.
C# Dev Kit Compatibility
At this time, the preview version of the C# Dev Kit extension ms-dotnettools.csdevkit is not compatible with the Uno Platform extension. It requires a preview version of the C# extension ms-dotnettools.csharp that contains major breaking changes.
Workaround
You can use both the Uno Platform and C# Dev Kit extensions but not simultaneously. The easiest way to accomplish this is to create profiles inside VSCode. Using this method, you can:
Create one profile for Uno Platform
Disable, if installed, C# Dev Kit extension
Enable
useOmnisharpinside the configuration
Create another profile for C# Dev Kit
Enable (or install) the C# Dev Kit extension
Ensure that
useOmnisharpis disabled inside the configurationDisable the Uno Platform extension
You can then switch between both profiles according to the type of dotnet project you are developing.
You're all set! You can now head to our tutorials on how to work on your Uno Platform app.
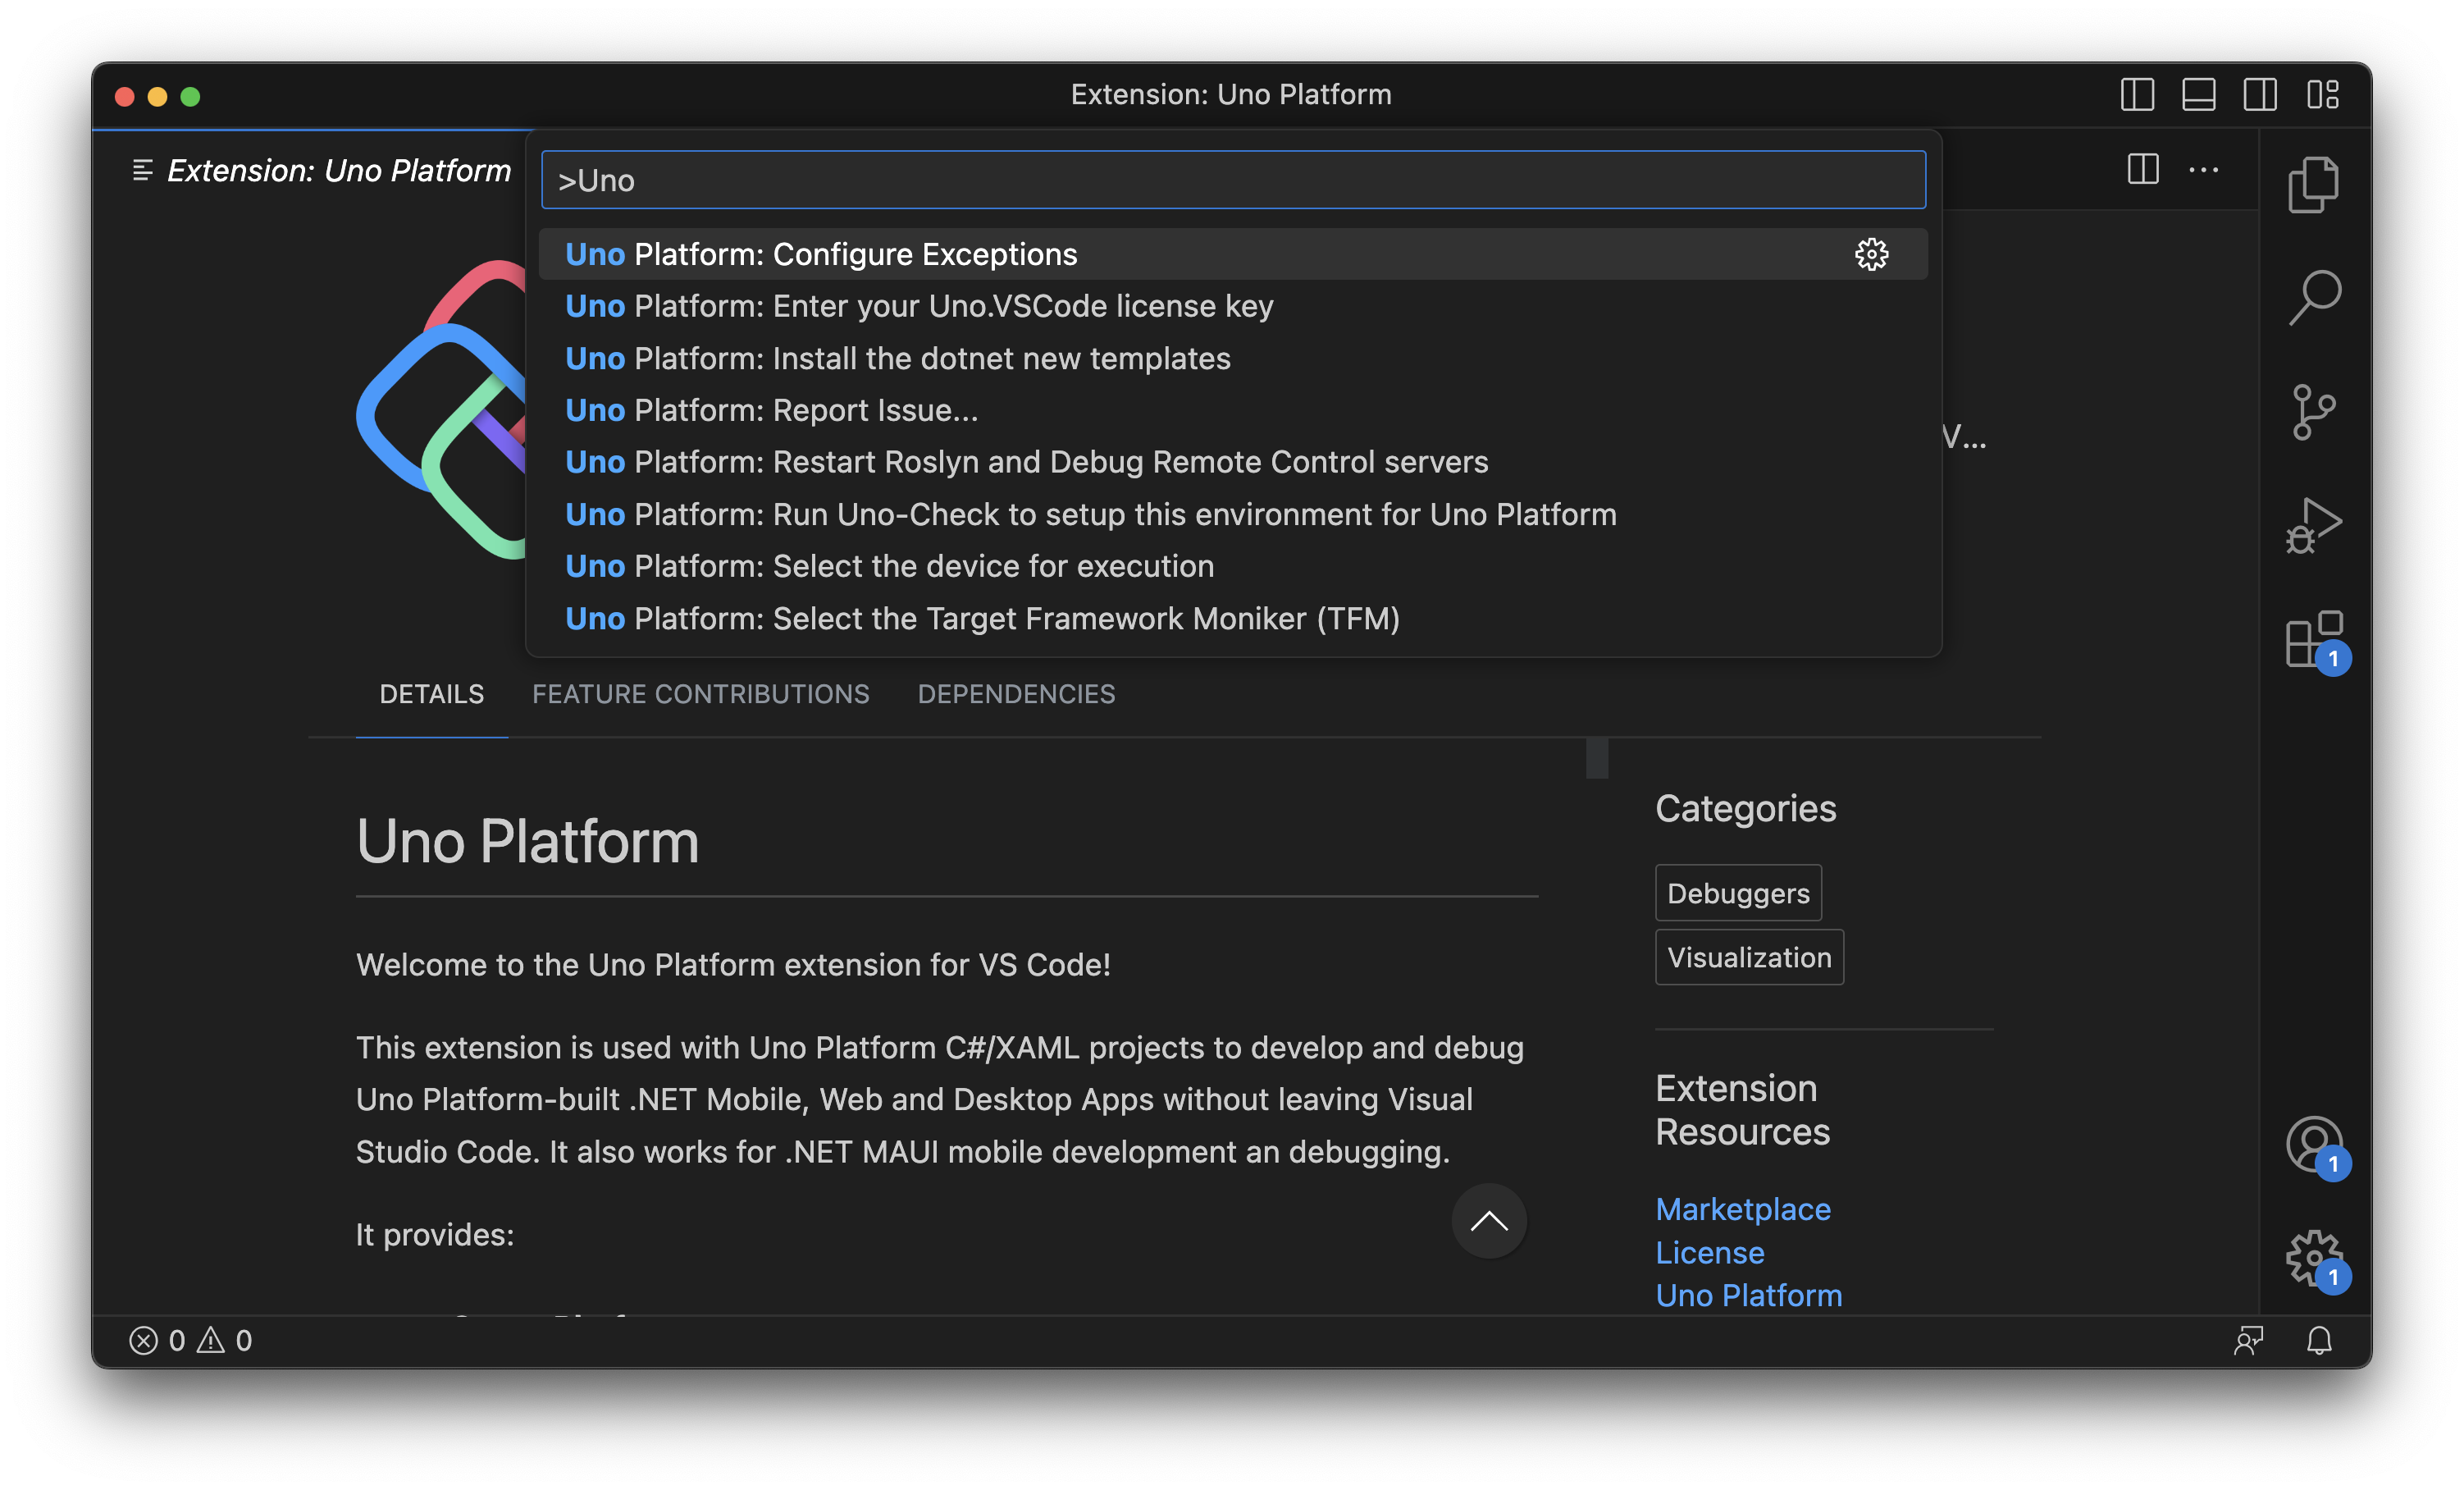
Explore other features
The Uno Platform extension provides additional features to help you develop your application.
You can explore them by pressing F1 or Ctrl-Shift-P and typing Uno Platform to see the list of available commands.
Getting Help
If you continue experiencing issues with Uno Platform, please visit our GitHub Discussions or Discord - #uno-platform channel where our engineering team and community will be able to help you.